Are you up for a little campaign creation?
We sure hope so! We’re going to take you through the ins and outs of creating your first Facebook Ad – where you can drive traffic to your website, bring people to you, and increase your audience engagement!
How To Create Your First Facebook Ad Campaign
Hey, Petpreneurs, Jane here, and I am going to help you dig into the wild world of Facebook ads!
Facebook seems to be in a constant state of change. The largest notable change is that we now call it Meta.
Meta (Facebook) is notorious for changing things on a weekly and sometimes daily basis. It can be frustrating and we share frustration with you. We are doing our best to keep our information current so that our members always have something at their fingertips that is easy to use and remember we are always here to help you.
Back in the olden day of Meta (Facebook) we used to be able to reach a lot of people organically and easily by simply having a page, but unfortunately, Meta (Facebook) has gotten to the point where they’ve said:
You know what? You need to pay to play.
This means that if you want to reach people on Facebook these days, the only reliable way to do it is to run Facebook ads.
But how do I make sure I get the most bang for my buck?
Let’s dive right into how to set-up a basic campaign that can help maximize ROI.
Before You Begin:
If you have not set up your META (FACEBOOK) for BUSINESS account, get that done first, then come back and join us here.
1. Getting Started:
To begin, log into your Business Page – Ads Manager account.
To make it easy for you, here is a direct link:
https://business.Meta (Facebook).com/adsmanager/
1. Make sure you are creating your ad under the correct account.
2. Click the +CREATE Button and we are on the move.
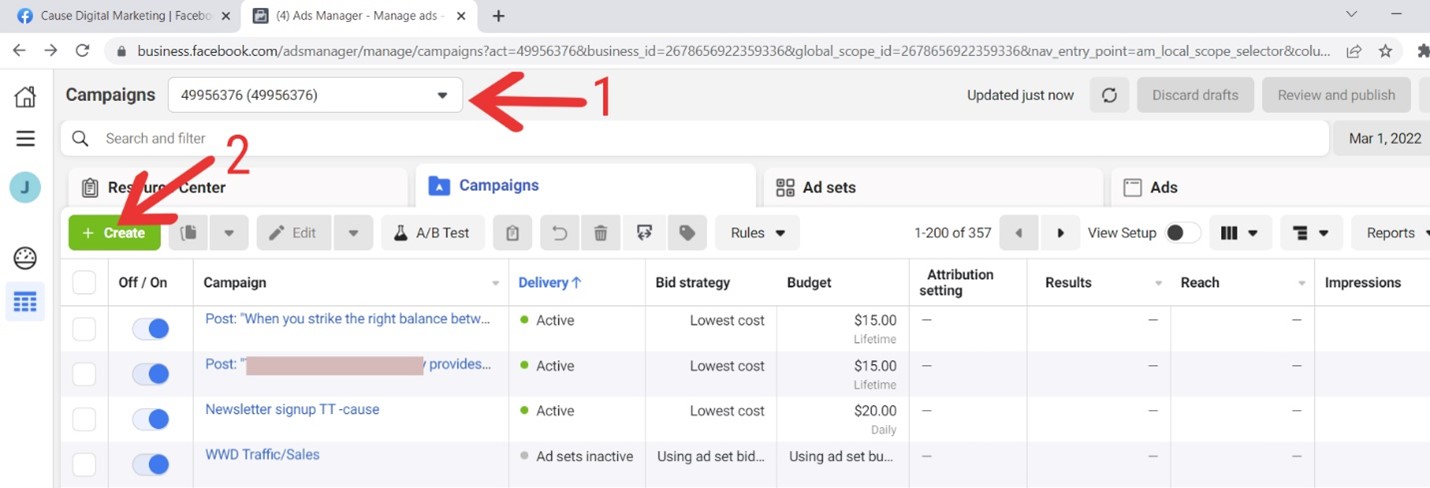
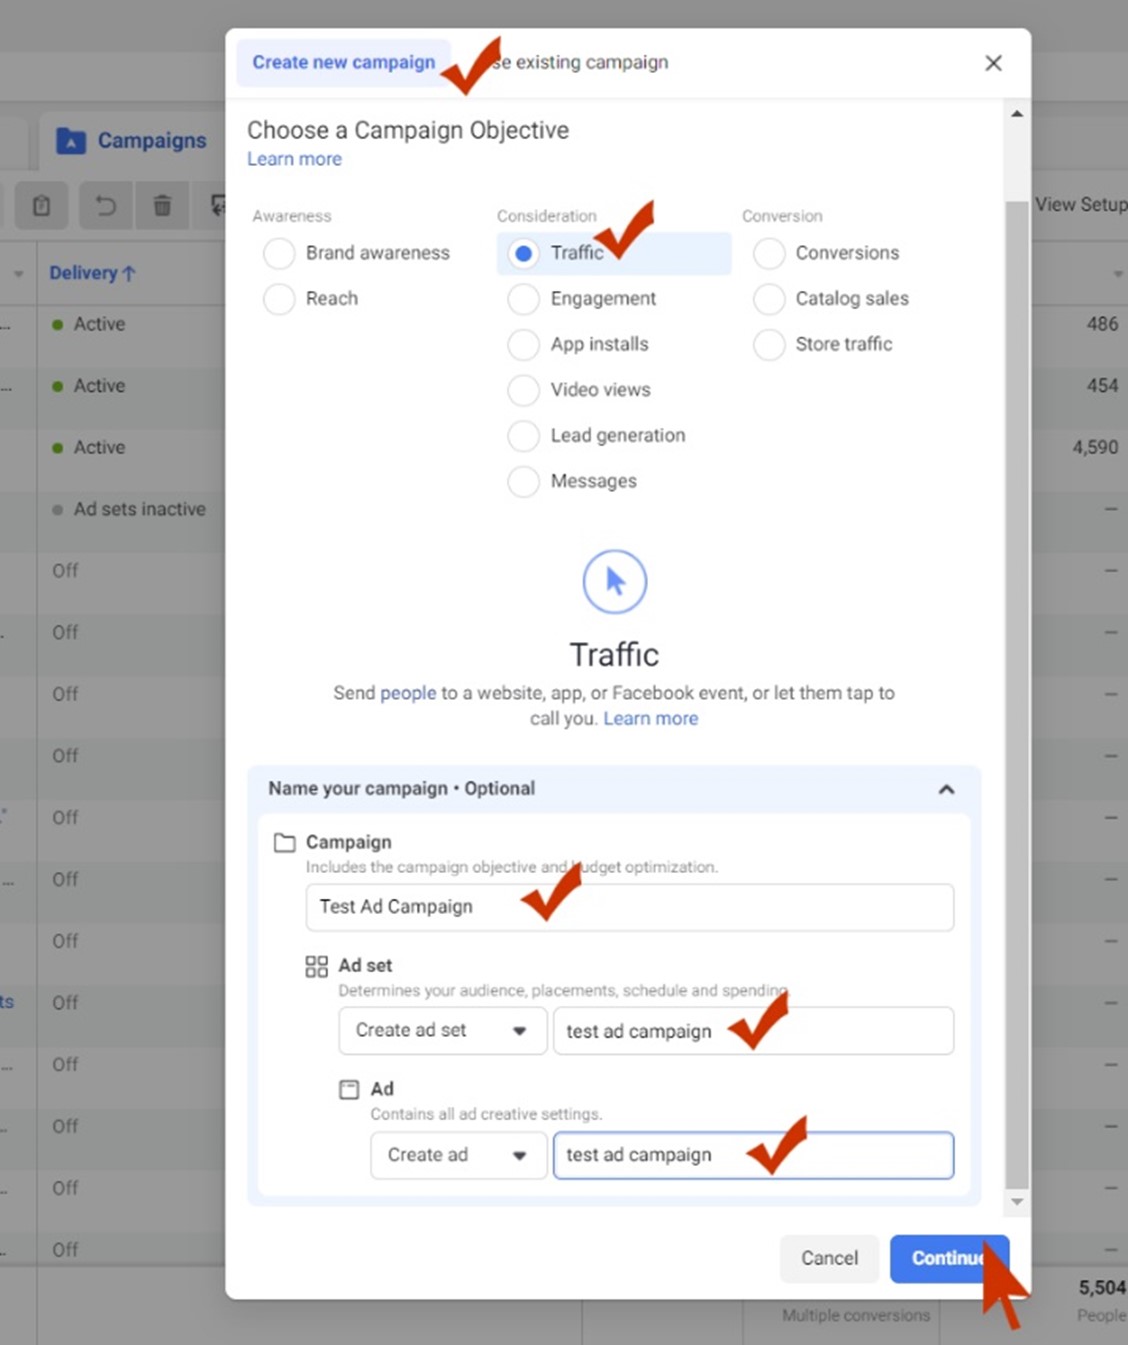
3. You will see a pop-up screen (Image 2).
For your first ad, we suggest using the option “Traffic”. The intention is to send people to your website. This will generate some curiosity about your brand and general interest in learning more about you.
Also, Name your campaigns. This will help you remember why you were doing the ad. i.e.: “Drive Traffic to Product Page” or “Traffic to Website March 2022”. This is visible only to you.
Campaign Objective
Decide what your main objective is. Making this choice tells Meta (Facebook) what you want people to do when they’re looking at your ad.
i.e.: Do you want to target people who visit your website, make a purchase, or do you want to show your latest blog to as many people as possible?
Meta (Facebook) currently has eleven different campaign objectives:
- Brand awareness – Show to people who will remember your brand.
- Reach –Meta (Facebook) shows your ad to as many people as possible.
- Traffic – Send people to visit your website.
- Engagement – Targets people who are more likely to like your post, add a comment, and more.
- App installs – Show your ad to people who will install your app.
- Video views – Get people to see your new video.
- Lead generation – Shown to people who will be more likely to fall into your sales funnel.
- Messages – People who are more likely to send you a DM.
- Conversions – Ads are shown to people who will take actions like buying your products, and subscribing to your services.
- Catalog sales – Showcase a product catalog to new audiences who are most likely to buy something.
- Store traffic – People who are nearby to your physical store.
In our example, we will choose TRAFFIC. This is a great place for a beginner to start.
Campaign Page:
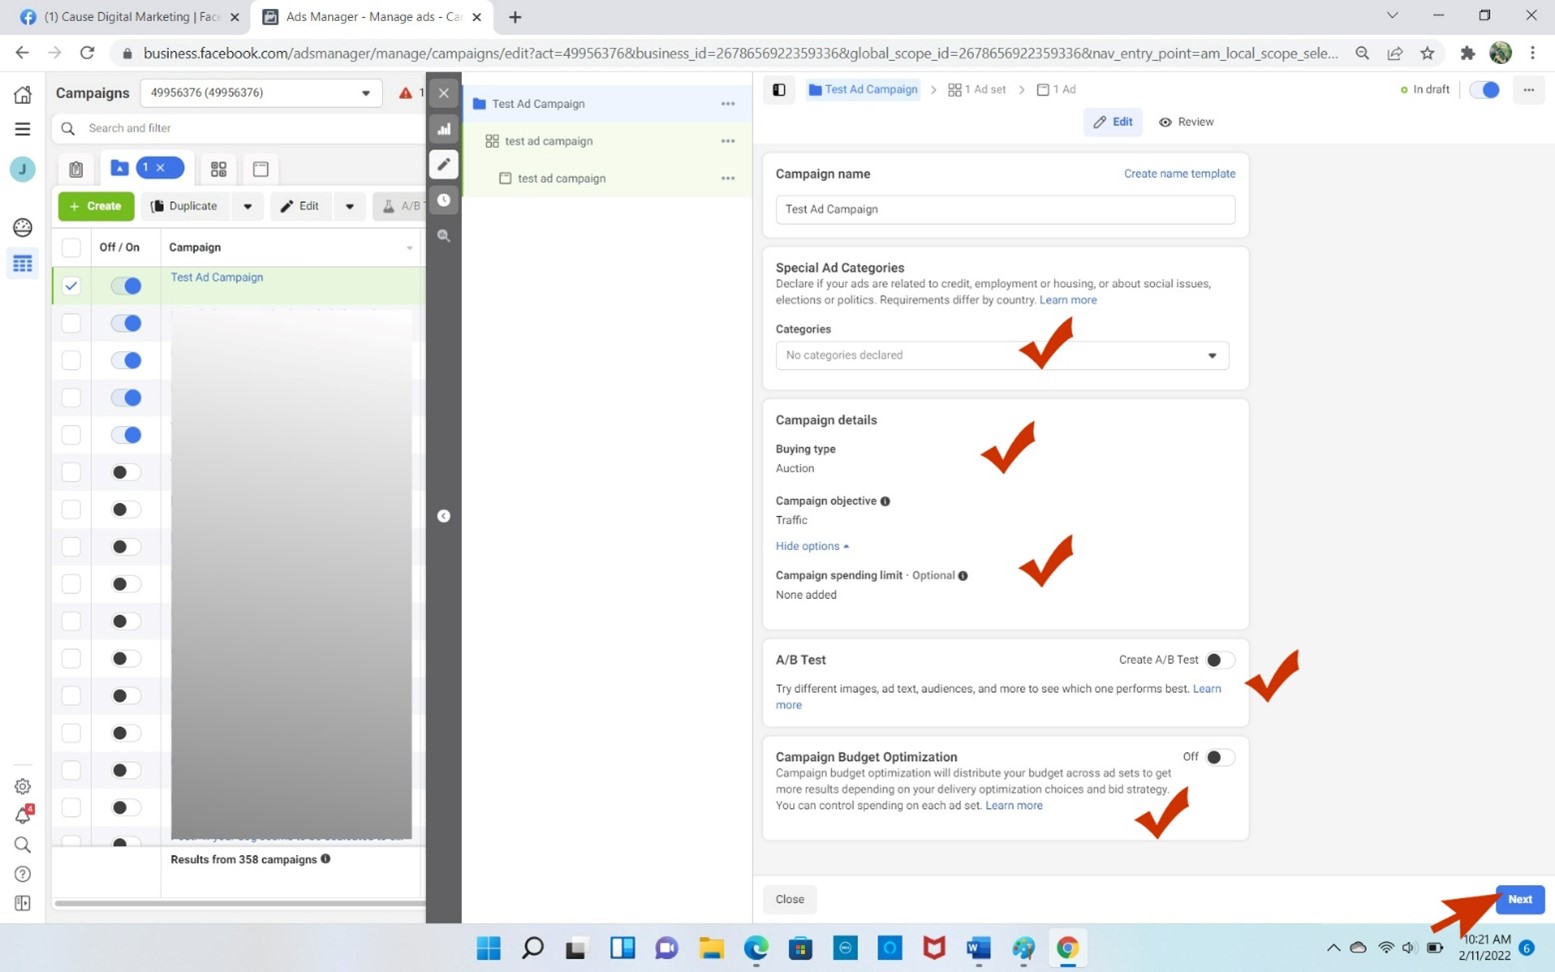
You will see that your campaign name has automatically populated (if you took care of that on the first page). Under special ad, categories take a look at it in the dropdown menu however it’s most likely that you are not going to fall into any of these categories or concerns or social issues.
Campaign details:
Buying Type: Auction: as a beginner, you can only have an auction type selected. The other types are available only for qualified buyers that work with ads on a more professional level.
Campaign Objective: We have already chosen traffic and we don’t need to worry about the campaign spending limit at this point we will come to that on the next page.
A/B tests: we recommend leaving off at this time as well as the Campaign Budget optimization. These are not something you need to get into at a beginner level.
You can see a sample of this screen in the image below. Not much to do here just click NEXT.
2. Setting Traffic/Budget:
You are off to the races. This next page is a little longer and requires some attention. But you have this. No Problem.
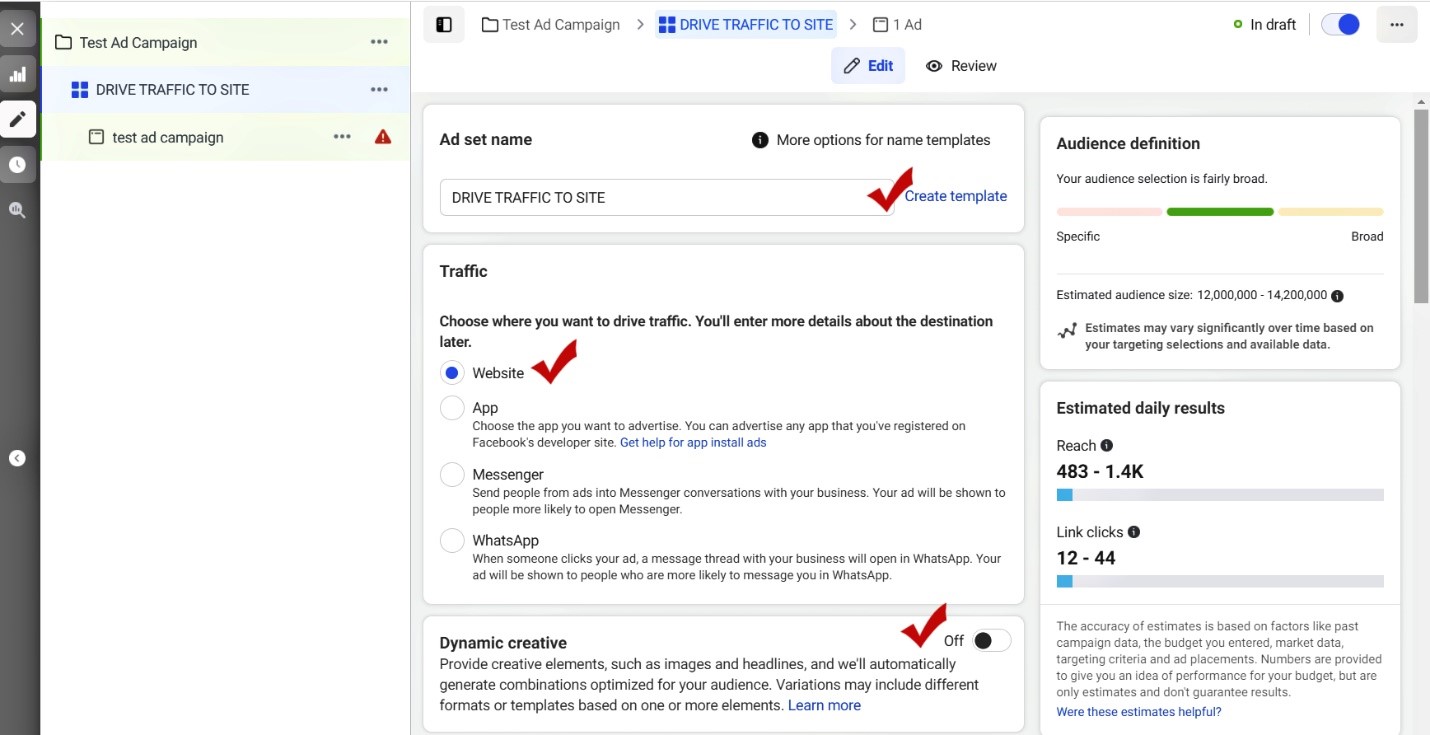
Ad set name: You may have already named it. Choose a recognizable meaningful name that works with your objective. (i.e.) DRIVE TRAFFIC TO SITE.
Traffic:
Website
App
Messenger
WhatsApp
As a beginner, you will likely choose WEBSITE, as you grow your business.
Dynamic Creative: Skip this – Not needed for a beginner.
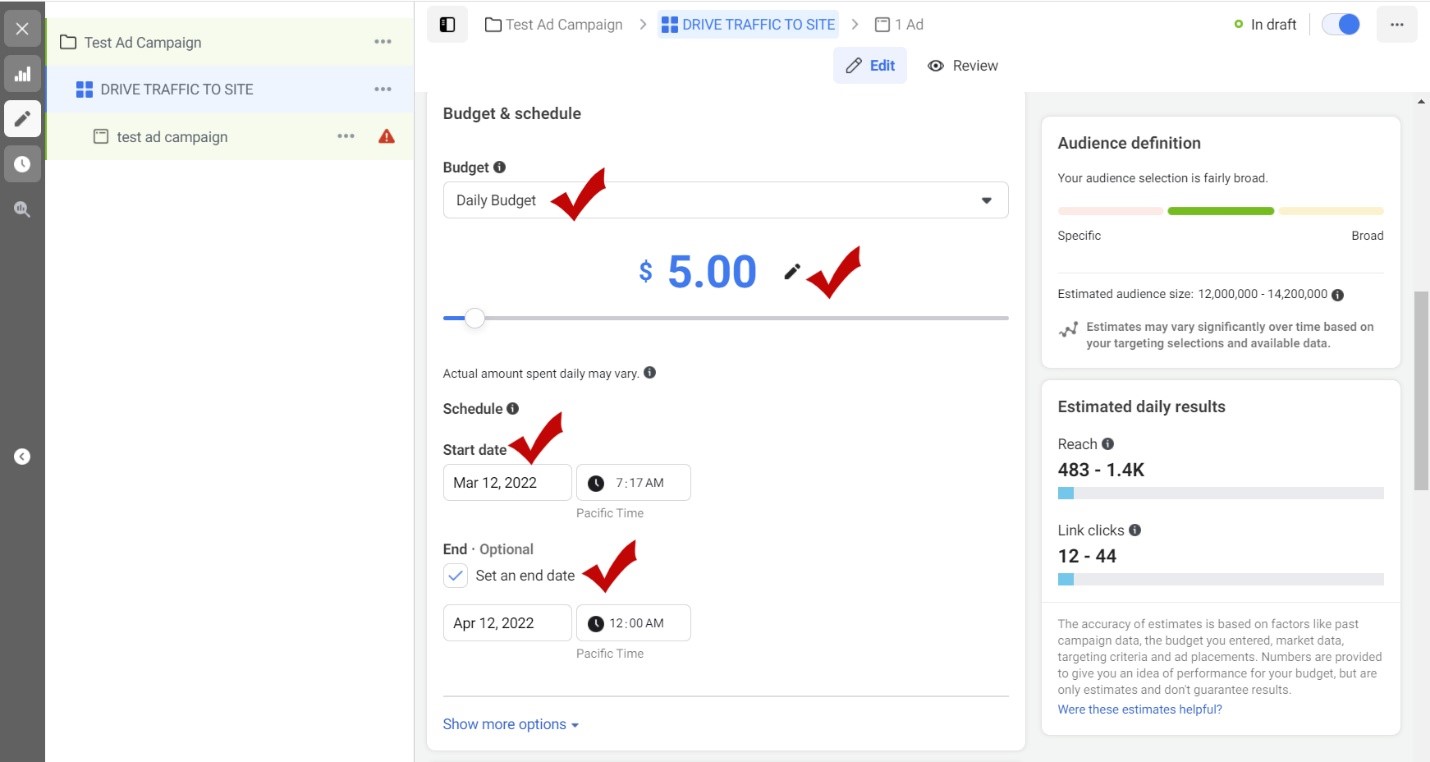
3. Budget & Schedule:
Budget:
The great thing about Meta (Facebook) advertising is you do not need to have a huge budget. Larger companies may be spending hundreds and thousands of dollars a day on their Meta (Facebook) advertising but you don’t need to. In fact, you can start as low as 5 to $10 a day.
Schedule:
You have the option to choose a starting date and an ending date. Many Meta (Facebook) marketers choose to leave their ad open-ended so they only fill in the start date. And then they monitor the campaign until they feel the usefulness of the ad has run its course. Throughout this, you need to watch how your ad is doing and make adjustments to your audience to bump it back to life when things start to fall flat.
OUR ADVICE:
When you’re testing out Meta (Facebook) advertising, you may want to set your schedule for a period of 15-30 days. You do want to make sure you are monitoring it on a regular basis. This is a nice introduction to see how Meta (Facebook) advertising might work for you without blowing your entire marketing budget. **Also, it takes a few days for your ad to ramp up. It will need to go out into the wild world of Meta (Facebook) followers and find who is just right. This is the learning phase of your ad. Just sit tight, and give it time to grow.
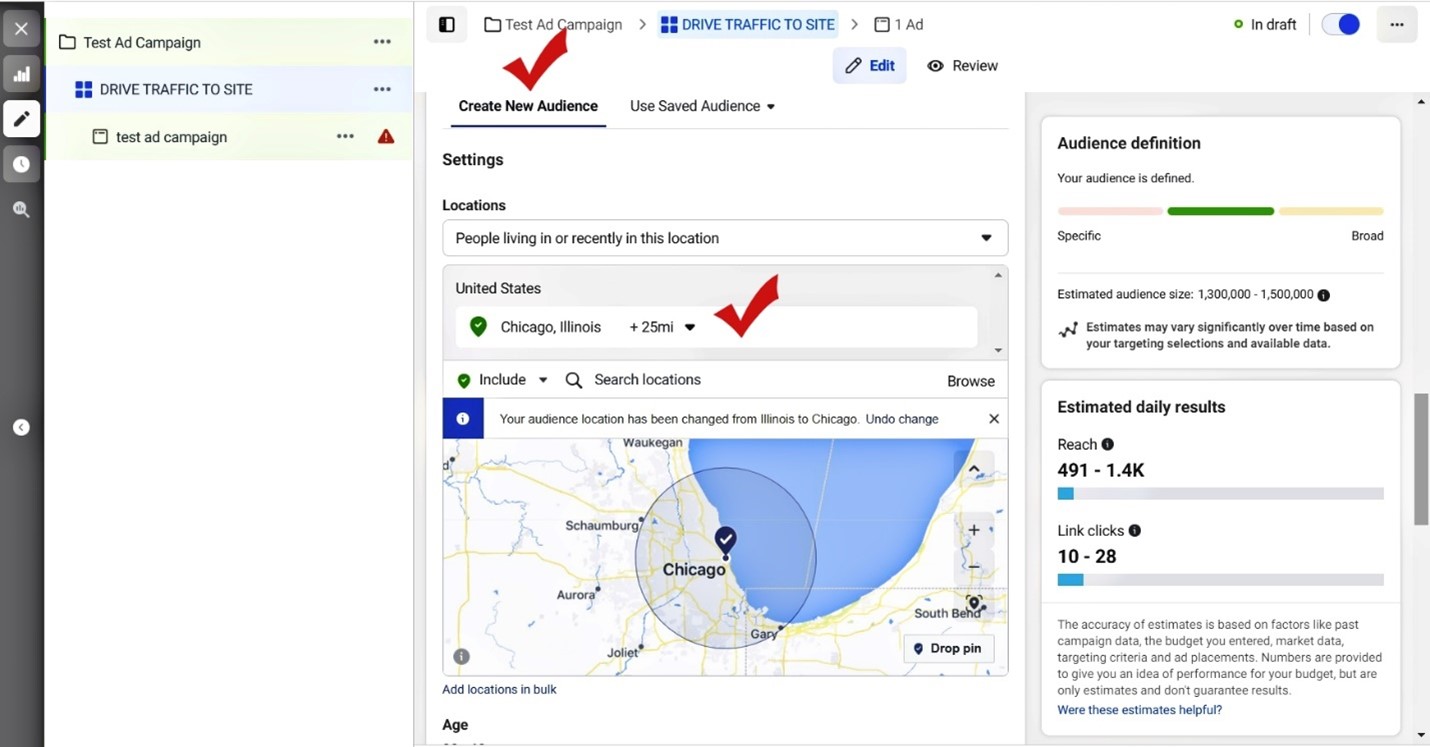
4. Creating Your Audience
If you have already been playing with building audiences you may already have some that exist and are ready to roll. If not, it’s OK, we can create an audience from scratch that will work for you. In the future, you will want to be creating look-a-like audiences as they will be extremely helpful in targeting people who are interested in your type of product.
Custom audiences allow you to input a customer list and Meta (Facebook) will generate some parameters that they think are similar to existing customers or people Meta (Facebook) thinks would likely engage with your brand.
You can get pretty specific about all this, and if you have any questions, it’s certainly worth doing a session with me to dive deeper.
If you’re just working with a basic ad, it’s easy and effective to determine the ideal location. For this sample, I target Illinois, specifically Chicago.
You have the option to adjust the radius (i.e.25 miles).
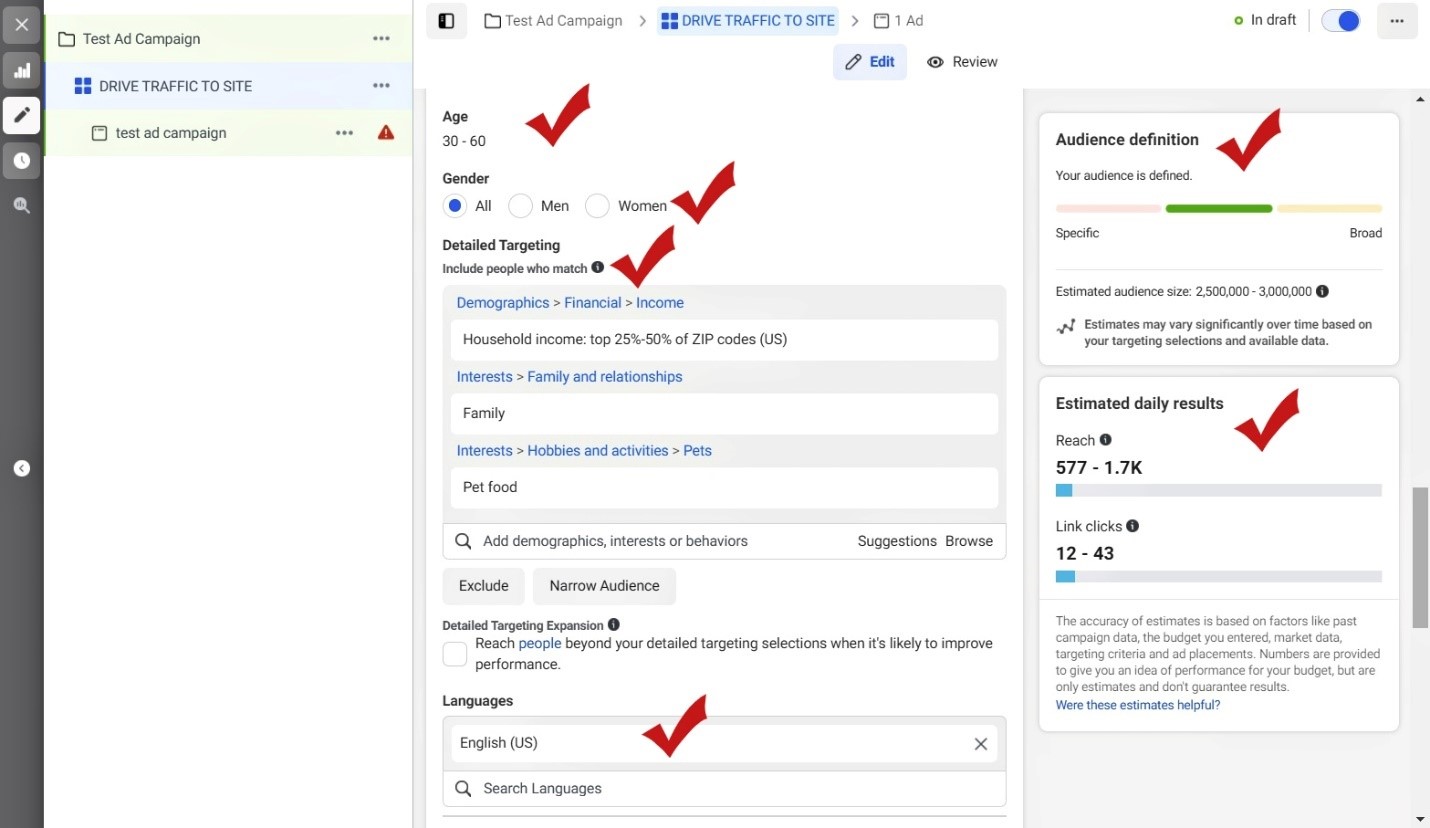
If you know a little about the demographics and psychographics of your ideal customer, you can use that information to zoom in on your ad sets.
Interest for my demo will include:
Men & Women – Ages 30-60 with a Household family income in the top 25% in America, and interests include Family & Pet Food.
NOTE: There’s a lot of trial and error to see what the search generates based on your input.
You can also exclude the audiences if you want to get super specific or if your general audience is way too huge.
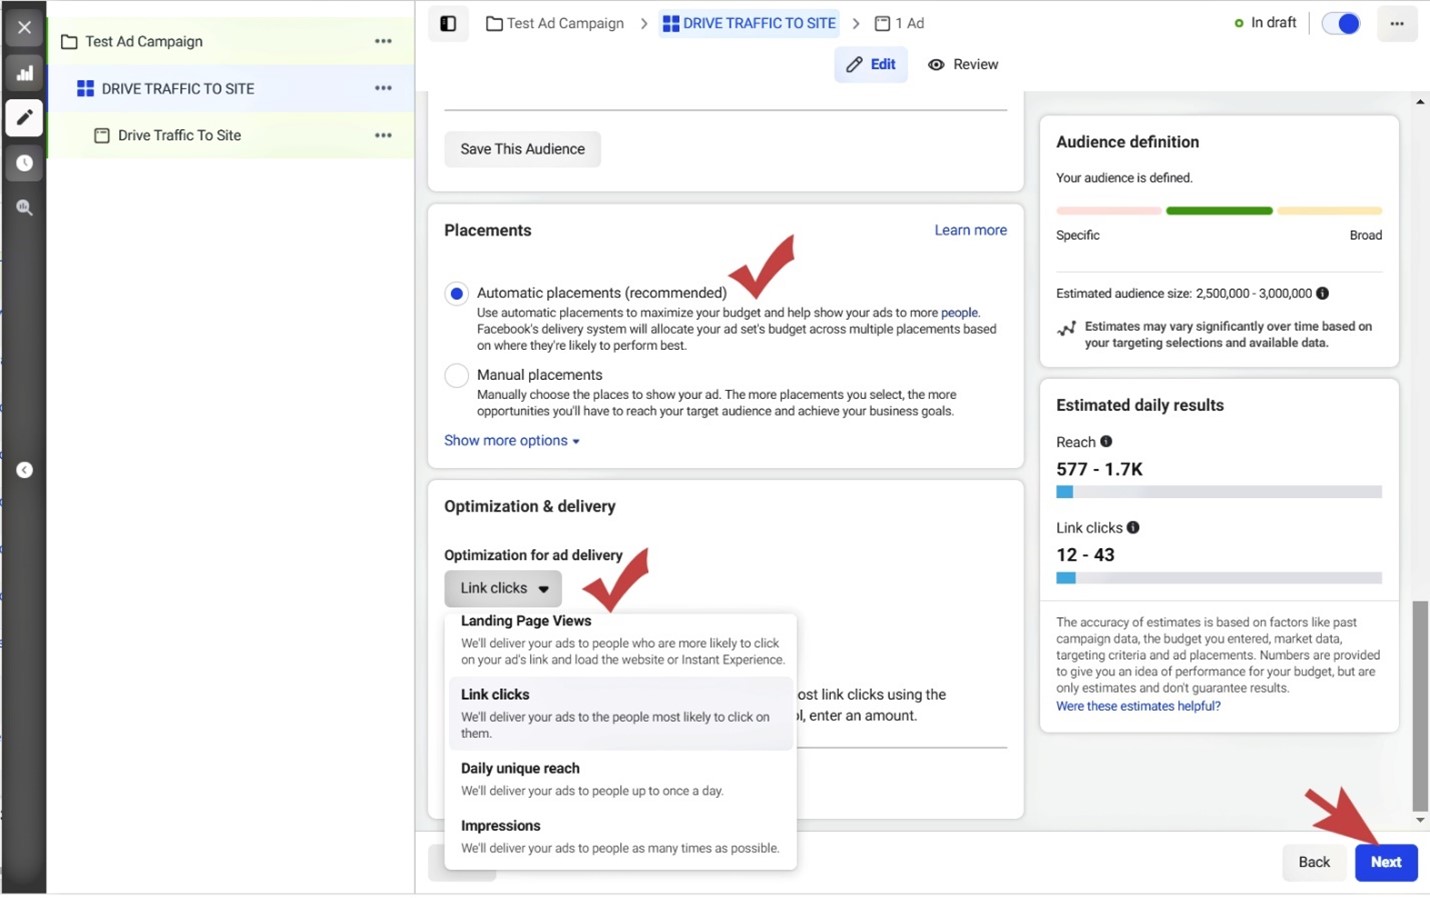
Watch the section on the right side of the screen – Audience Definition & Estimated day results. You want your Audience Definition to be in the ‘green’. Estimated daily results just give you an idea of possible reach. As you place with finding your Audience you will see this change.
Patience is needed in this process. Expect to spend some time here. It is worth it!
Save the audience to use for future ads.
PRO TIP: Keep your audience size specific. Do not just target the “USA”. This is far too broad and your ad will get lost in space. At the same time, it should not be too small. The good news is, they have a gauge (see in image 7) that shows if your audience is in the sweet spot.
Also, don’t let IOS updates freak you out. Meta (Facebook) advertising does still work!
Languages: Choose what is appropriate for your audience
Placements: Let Meta (Facebook) take care of this for you. As you become more experienced you can play around with this.
Optimization & Delivery: Reach your options and choose as needed. We are choosing Link Clicks for this example as we want people to click through to our website.
Cost Control is Optional: just leave as is.
5. Ad Creative – The Magic Begins!
This is the page where you get to add your creative and put your words into marketing genius.
You have the choice to: Create Ad, use existing post or use Creative Hub mockup
We are going to: Create Ad
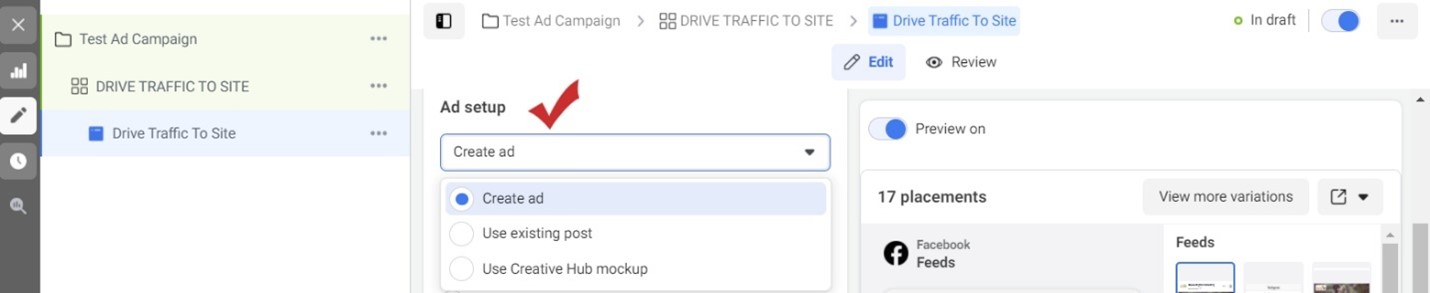
Ad Setup:
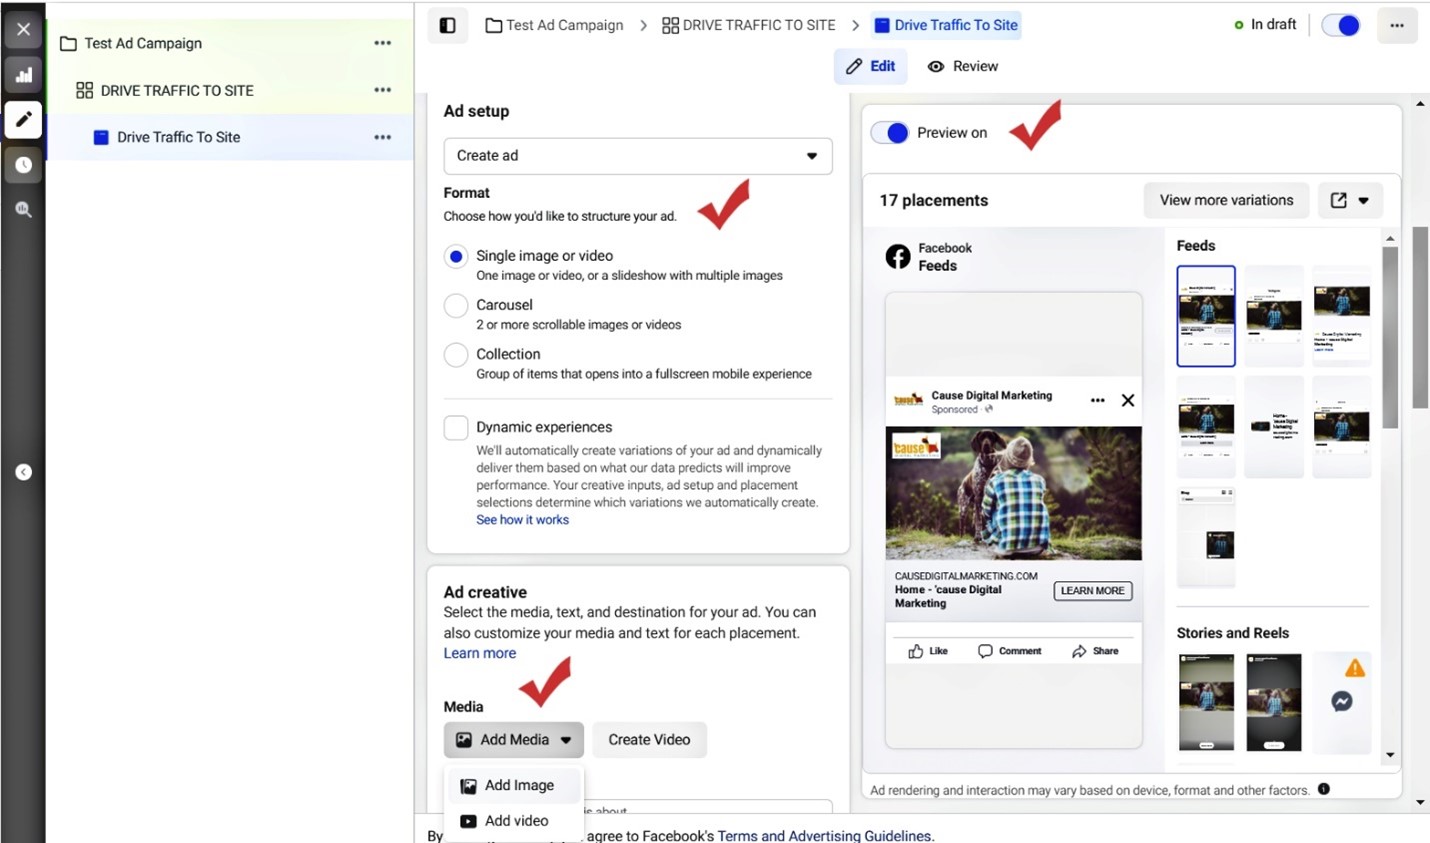
You have a few choices and need to choose what suits you best, but in early learning, we suggest choosing a single image.
NOTE: only use images you are allowed to use. Just make sure you have rights to that image before using any image. For tips on how to select an effective image to help your Meta (Facebook) ad be successful check here: Best Practices for Ad Images
In our sample, we are choosing a single image ad.
Ad creative
This is where you upload the image you wish to use in your ad.
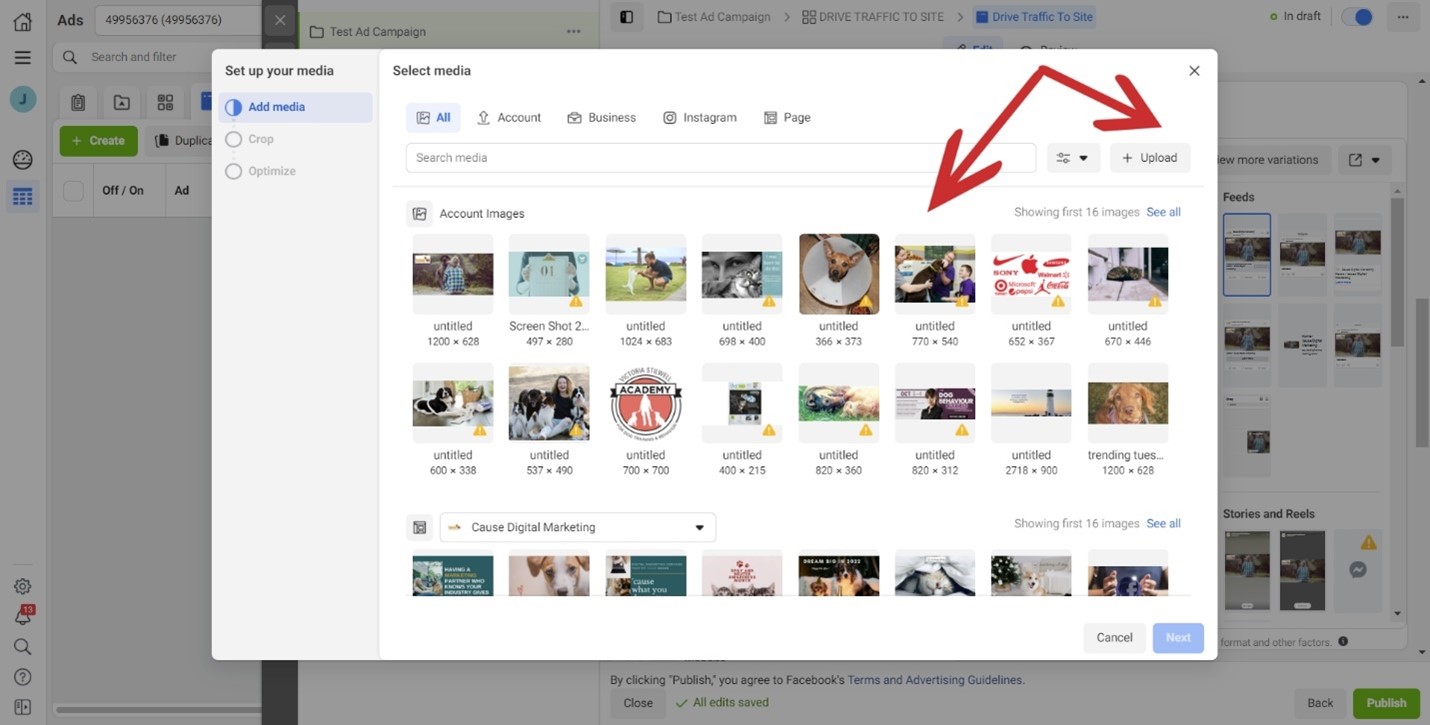
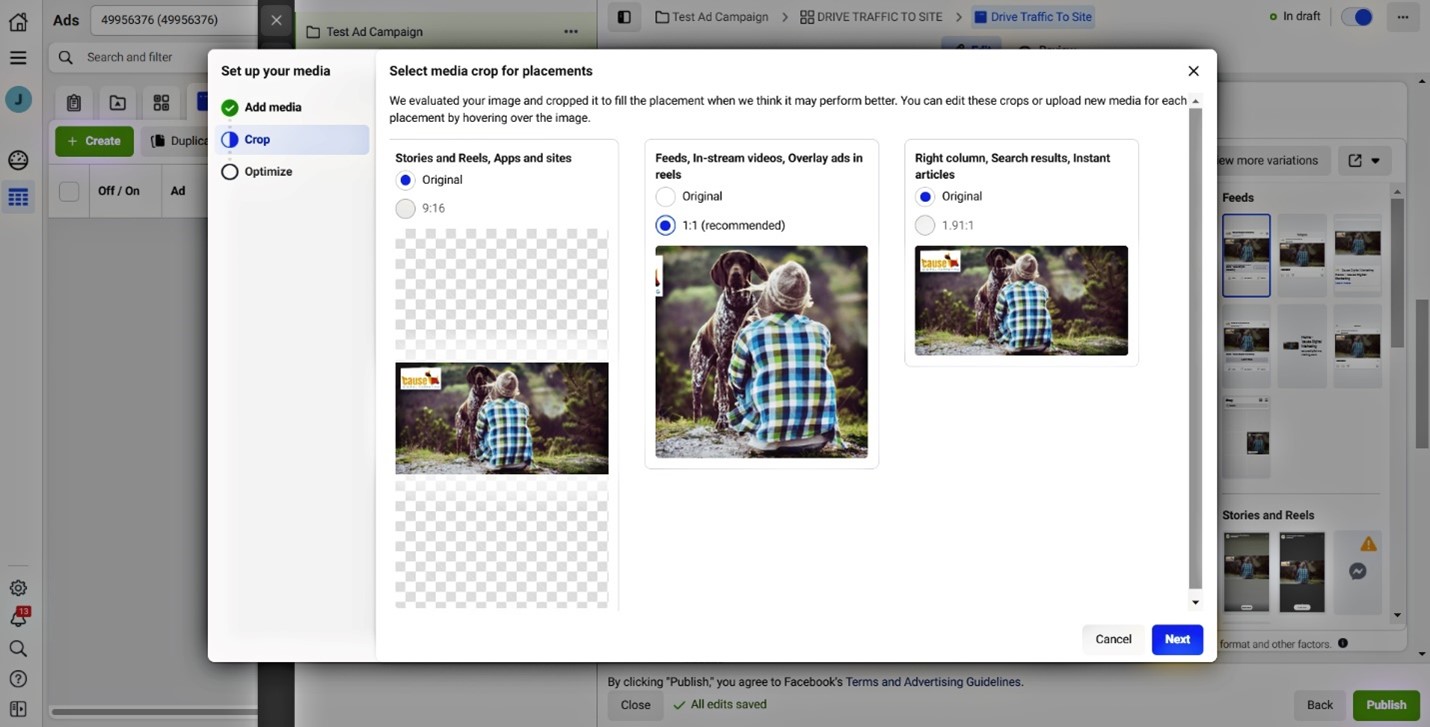
Select Media:
A pop-up will appear here you may see a series of images that you have uploaded for previous activities on Meta (Facebook). If there are none there you can use the upload button to add images that you want to try to use in your ads.
This is where you will see how your image will appear on different platforms. Sometimes your image will have an adjustment and recommendation by Meta (Facebook). As you can see our middle image has been adjusted. You can change it back to the original if you prefer, but we think this looks nice so we will go ahead with their recommendation.
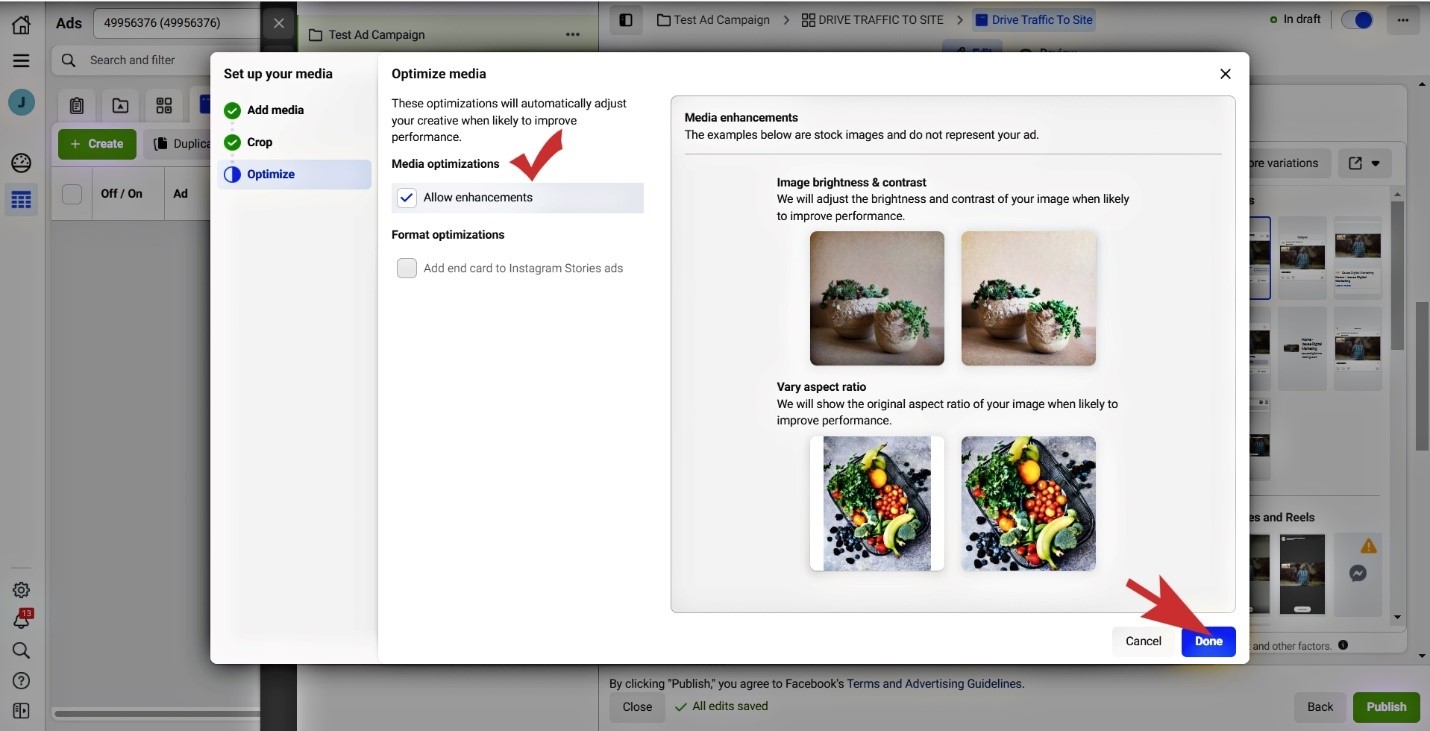
Optimize Your Media:
In this case you really don’t need to do anything except allow for enhancements, this will be auto filled for you and we recommend you stick with what Meta (Facebook) is offering here. Click done and your pop up will disappear and you will be back on your ad creation page.
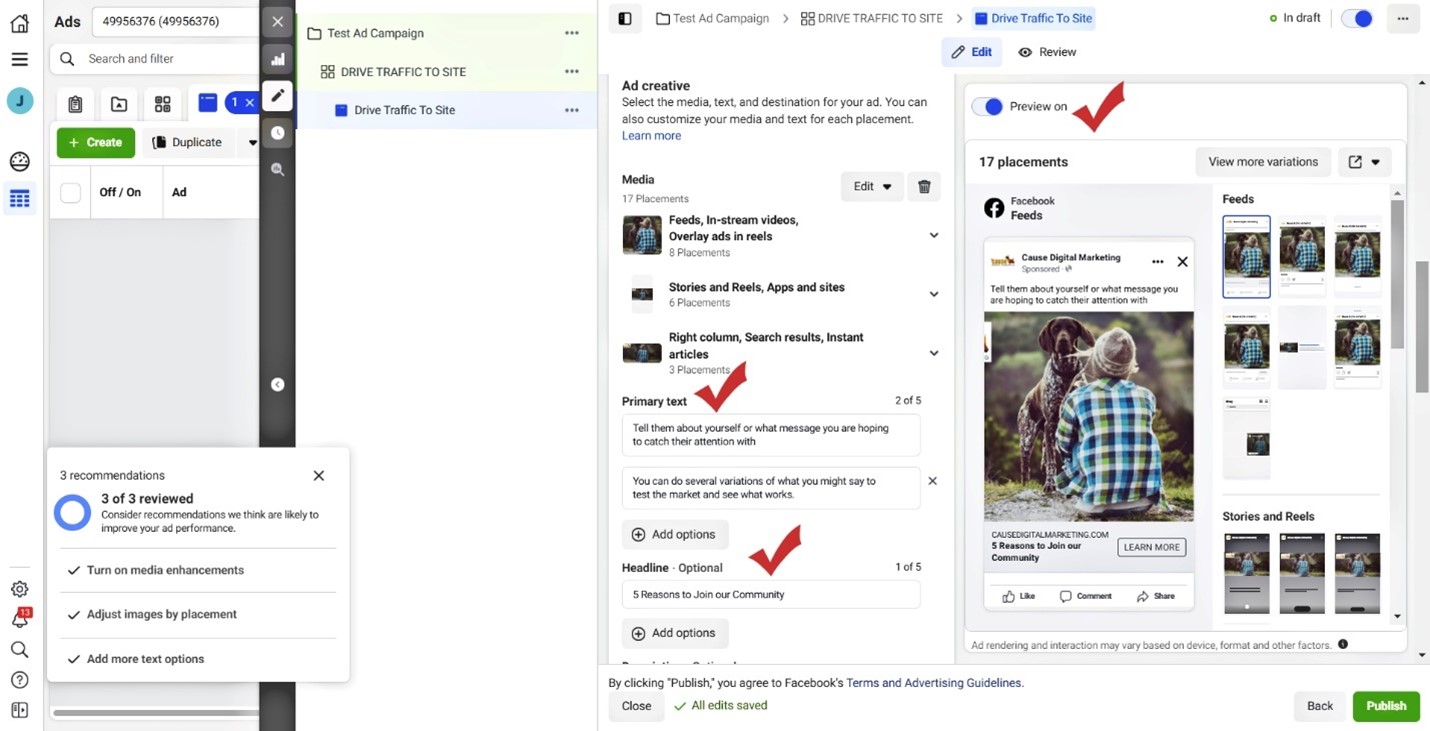
Primary Text:
Primary text is what you want to tell the people who you’re trying to attract.
Do you want them to come over & sign up for newsletters? Do you want them to just visit your website and learn more about you?
This is your opportunity to very specifically let them know what you are about and what you are expecting from them.
You will notice that there is an add “options” button under your first statement. This is an opportunity to try out two different types of language or three or more if you want. Basically, Meta (Facebook) will send out the different versions and you can track how they’re doing and make adjustments to your ad as it goes.
Headline:
This is optional; however, we think it’s a great opportunity for a punchy statement. Put your company tagline or indicate something exciting about what you’re trying to sell. As you type it in you will see it populate on the right side of the screen. Just make sure you have the preview on the button.
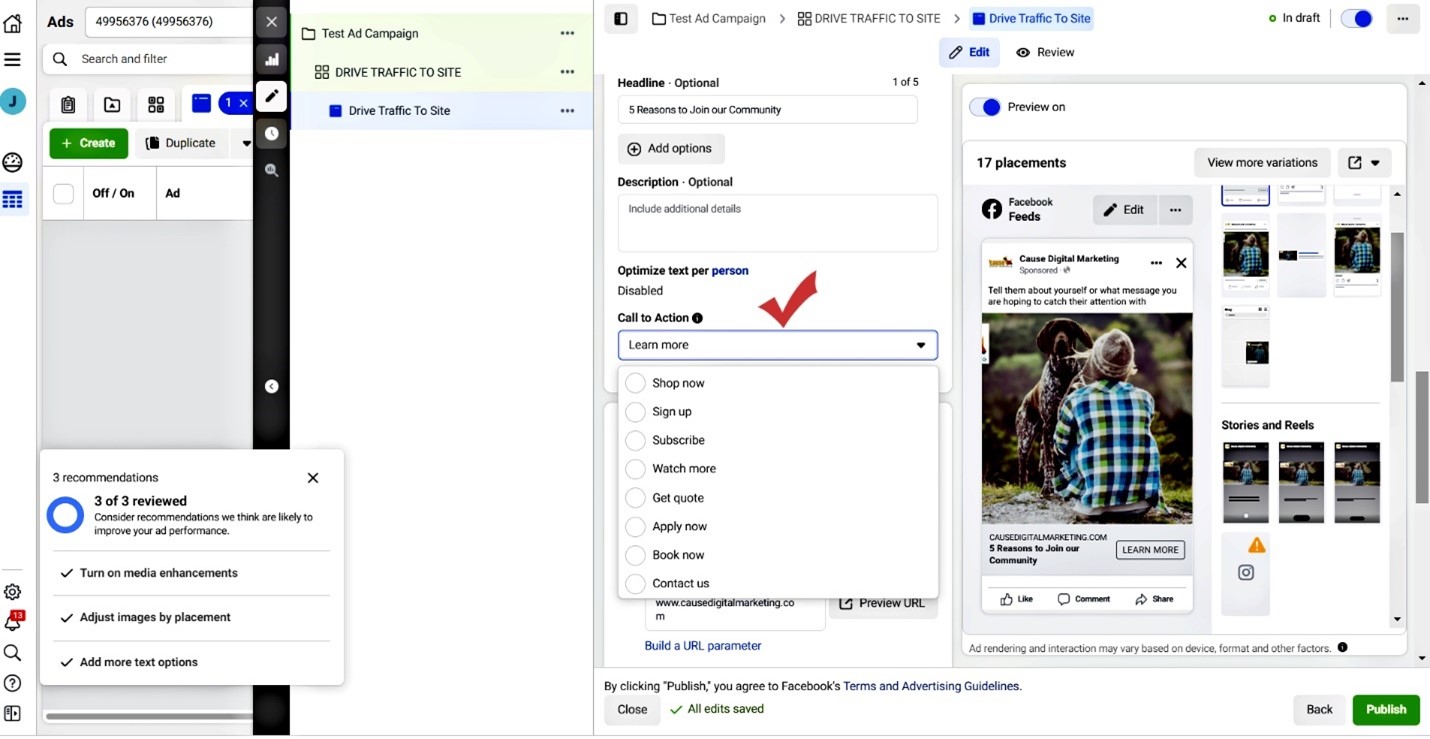
Description: optional
We feel like we’re saying enough with the headline in the primary text so we don’t need this field. If for some reason you can’t get enough into the headline and the primary tax this is an opportunity to add a little bit more.
Call to action: This is your opportunity 2 tell them what you are hoping they will do. Just choose what applies. In our case, we’re selecting learn more.
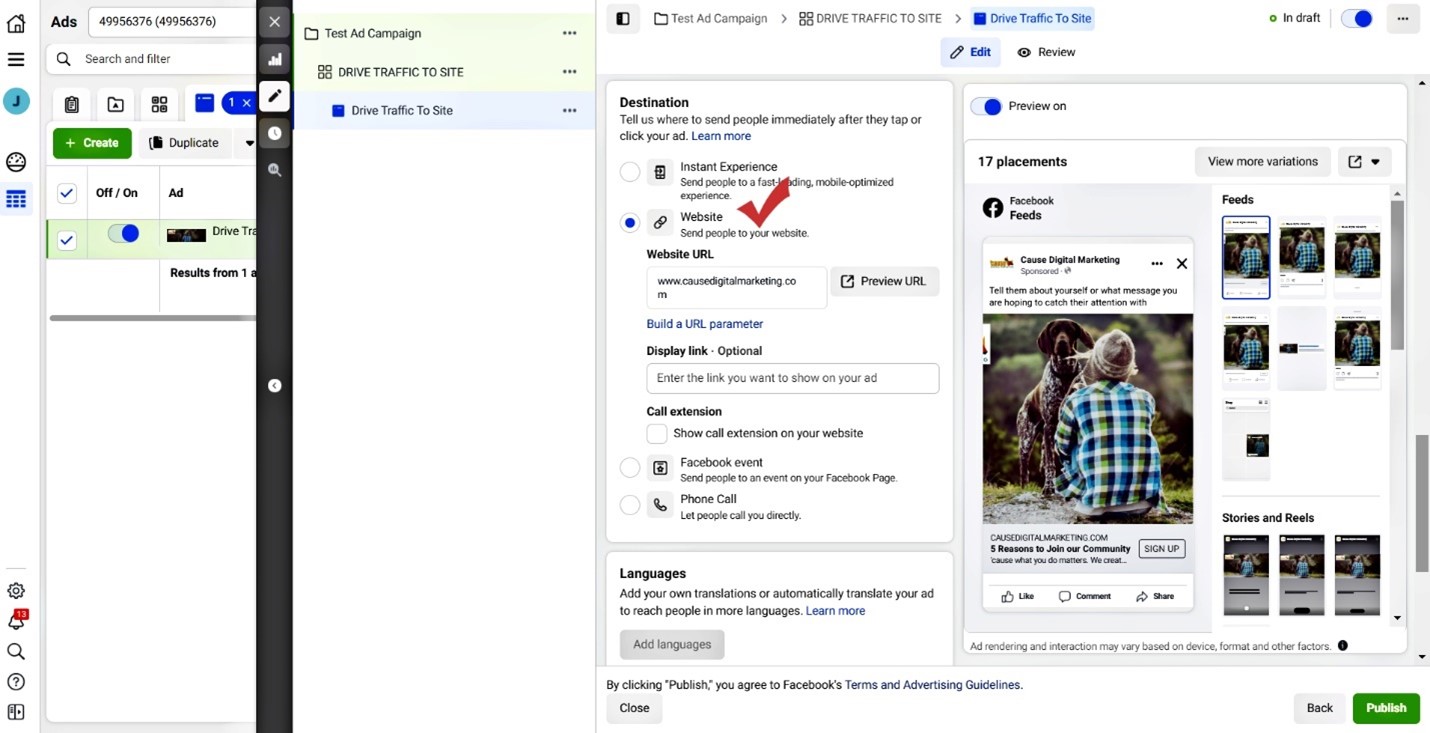
Destination:
This is where you will add your website. You can preview what it looks like, but as long as you have it typed in correctly it should be good.
Tracking:
We highly recommend that you create a pixel that connects your website to your Meta (Facebook) account.
We are not going into that type of training for this particular information session, but once your pixel is up and running you would go ahead and click website events and this pixel will be incredibly valuable in providing you and Meta (Facebook) a better way to find the right people to see your ad.
To learn how to connect to pixel to your website check here: How To Create and Install a Pixel
![]()
Great news! You did it. You are about to hit publish.
Before you hit that publish button and set your ad into motion, just go back up and reread your copy to make sure there are no typos.
Hit Publish!
CONGRATULATIONS!! Your Ad is going into Review. This can take a few hours or up to 24 hours to be approved by Meta (Facebook).
Watch it run for a few days.
It may go through a ‘learning’ phase before it is fully running.
Once it is up and running, you can check your results.
6. Understand your Ad Data
Let’s say the ad has been running for a few days. Now you have some data to work from.

On your campaign list, you can see:
Results: the number of link clicks on the ad.
Reach: the number of people who’ve viewed the ad.
Impressions: how many times people have seen it
Cost per result: how much it’s costing per link click.
If you click your campaign name and then again under ad set name, you can dive in a little deeper and view results based on the ad image.
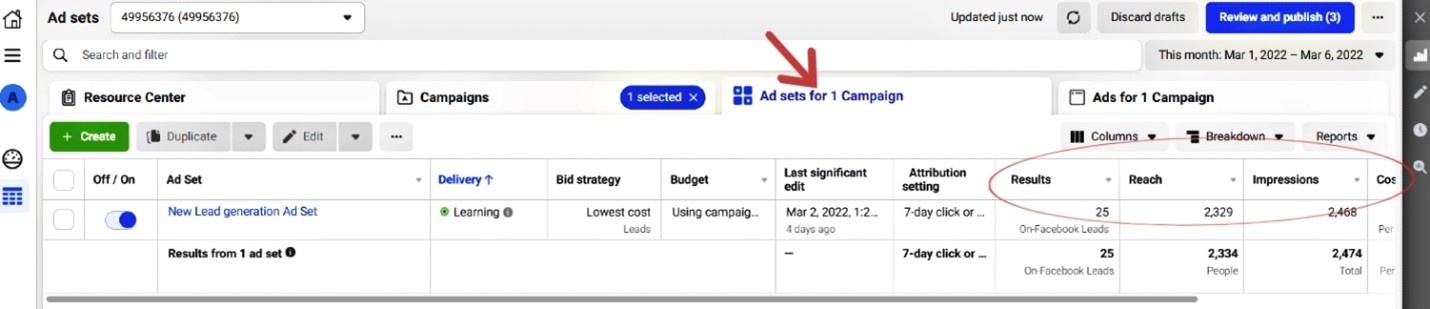
Scroll across and you can see those same stats but for the individual ad. This will give a great indicator of which ads are doing best. It may also help inform your decision.
Cost per results will help you know if your ad is working well.
Sometimes some images work better than others. As a more advanced option, you can (within the same ad set) add more images to give variety by duplicating the ad and simply replacing the image. In this case, you can watch how the different ads perform and then let the strongest one or two runs while turning off the ads that are not gaining any traction.

That’s really it then!
Check-in on your ads at least once a week. This basic demo is for bringing traffic to you, so make sure you know what works and that you are keeping people engaged!
Good luck Petpreneurs! It gets easier the more you do it, and we’re always here to help!


